Wednesday, September 9, 2009

Garden Tips: Storing Your Bulbs

I am of certain convinced that the greatest heroes are those who do their duty in the daily grind of domestic affairs whilst the world whirls as a maddening dreidel. ~Florence Nightingale

If you are in a cold climate with frost you'll need to store your non-hardy bulbs like dahlias, gladiolas or cannas. There are many ways gardeners store bulbs until they can be planted out in the spring. The main things they need are: dry, cool and dark. One easy method is to wrap each bulb, tuber or rhizome in newspaper and then store them in a cardboard box. Shoe boxes work great for this. Label the box, place the bulbs inside, packing loosely and put the lid back on. Store them in a dark closet or area in the basement where it remains cool.

Last winter some of my shrubs received horrible damage from chewing rabbits, where the years before they didn't. If you are in doubt wrap the young trees and the bottom of the shrubs with hardware cloth, chicken wire etc. this fall before the snow sets in.

Deer can also cause damage, and if you want to protect a tree or shrubs you will need to surround the trees and shrubs with a sturdy cage or wire fence--chicken wire won't be tough enough. Those bucks are very strong, and they can easily damage a small shrub or tree with their antlers. I've seen the damage to a few smaller pines my parents had in their yard.

If you are in Zone 5 or colder be cautious planting new perennials now. They should be planted and mulched heavily no later than 6 weeks before the hard frosts start.

Lastly, take a look at your landscape and gardens. Make notes of what you liked, didn't like, what did well, and what failed or didn't do as well as you liked. Consider if you want to add a new bed in the spring and start getting it ready now instead of waiting. The head start makes a big difference.

Growing and Caring for Grape Hyacinths:
http://www.oldfashionedliving.com/muscari.html

Tuesday, September 8, 2009

Caring for Copper

Caring for Copper

You can buy commercial cleaners that will work on copper pans or bowls, but many people still love the old fashioned methods using household items to clean their cookware.

You should never use scrubbers, steel wool, or any other harsh method of scraping on copper. Use only cooking utensils made out of wood, plastic or nylon when cooking and keep the heat at lower levels.

Always soak the pan immediately after cooking. Wash with a sponge or cloth, rinse and dry as usual. You can leave it soaking overnight if need be, rather than scrubbing too harshly. For extra cleaning try one of these methods, afterwards washing, rinsing and drying as usual.

-Pour some salt or baking soda on lemon halves and gently clean the pan or bowl.

-Dissolve 1 teaspoon salt in 1 cup white vinegar. Add enough flour to make a paste. Coat the pan with the paste and let sit for 15 minutes to 1 hour, then clean.

-Mix together a paste of lemon juice and salt, and rub with a soft cloth, rinse with water, and dry.

-Pour vinegar over the surface of the pan or bowl and sprinkle it with salt-rub in the mixture gently.

-Make a paste of lemon juice and cream of tartar. Coat the copper and leave it on for 5 minutes, and then wash in warm water.

-If copper is very tarnished, boil your item in a pot of water with 1 tablespoon salt and 1 cup white vinegar for several hours. Wash, rinse and dry as usual.

MORE TIDBITS: If you have copper collectibles that have a patina verde finish they should only be cleaned with a very soft cloth such as flannel. Use a gentle detergent such as Ivory and warm water, rinsing afterwards. Never use ammonia based products or any type of degreaser.

More you might like:
Caring for Crystal
Cast iron Cookware

Wednesday, September 2, 2009

Reader's Questions: Transplanting and Bulbs

In the garden, Autumn is, indeed the crowning glory of the year, bringing us the fruition of months of thought and care and toil. And at no season, safe perhaps in Daffodil time, do we get such superb colour effects as from August to November. ~Rose G. Kingsley

Today I have some more garden questions and answers. I hope you find them helpful!

I have black eyed susan and daisy plants coming up that I don't think are going to have enough time to bloom before the weather starts turning. Can you tell me if these same plants will come up next year or do I need to start new plants from seeds. If they will come up next year when would be a good time to transplant them somewhere else? ~Linda

Black-eyed Susans are biennial, which means they live for two years, blooming during the second year. They form SO many seed heads that they should reseed and you will have new plants and will always have more than you'll need. In the spring you can dig around the roots and plant in a new spot if you wish. Later you'll have more plants, and you can move those in the spring or fall also.

You didn't say which type of daisy you were growing, but Shasta Daisy is the most popular. It's a perennial, and grows much like the Black-eyed Susans. Next year they should bloom for you. If you need to move them you can do that now. They will multiply and in a couple years you'll have more. Just dig them up and carefully divide the clumps, and plant where you want them to grow. Always keep transplants well watered and if possible move them on a day where it's not scorching hot.

Can you do anything with the seed pods that form on Calla Lilies after the blossoms are done? They look like little bulbs, are they plantable?

As a general rule you cut off the seed pods of calla lily and cannas so more energy can go into the tubers/bulbs than the seed pod. IF you want to try germinating and growing them from seed, then leave it on the stem until it becomes large and turns a yellowish shade. Pick the pods, and separate them. If you squeeze the pods the seed is inside them. Rinse them off and plant the seeds in pots. Starting them indoors is best, and the germination may take quite a long time. If you are in a tropical climate you could try doing this in the outside soil.

How do I store raw cabbage after thinly slicing for a salad (before dressing, etc. is added). ~Louanne

First, slice the cabbage as close to using it as possible. Store it in a plastic bag in the refrigerator for 2-3 days. To prevent it from discoloring you can sprinkle it with lemon juice-- just sprinkle and shake the bag.

More tips on cabbage harvest and storage plus recipes!
http://www.oldfashionedliving.com/cabbage.html

Monday, August 31, 2009

Fall Garden Tips: Planning for Spring

There is only one real deprivation, I decided this morning, and that is not to be able to give one's gifts to those one loves most. ~May Sarton

Autumn is bulb time and besides working your soil, planting at the correct depth for each is one of the most important things you can do for a good spring bloom. There is one other important detail though: plant the bulb with the "tip" facing up. If you look at each bulb you can tell that one end is more flattened. That is where the roots grow from-- the other end is where the flower stem will sprout from in the spring. When you purchase bulbs they all come with planting directions, but as a general rule you should plant them about 2 1/2 times the length of the bulb. If your soil is sandy or very loose you can go deeper.

A general guideline for planting common bulbs is:
Hyacinths: 6-8 inches
Tulips: 4-6 inches
Daffodils: 3-4 inches
Crocus: 1-2 inches

Usually it's best to plant bulbs when the temperatures fall below 60 degrees. That varies depending on where you live, so some of you have more time for your planning. When choosing places to plant your bulbs consider that when they pop up the trees will not have their leaves and the perennials won't be out yet, which means some normally shady spots will be sunny. Most bulbs like some afternoon shade and a fertile soil that is well drained.

Don't plant your bulbs next to a heated basement or wall where they will be warmer than normal. This could mess with the timing on the blooms. Cover the bulbs with a 2-3 inch layer of mulch such as wood chips, bark or peat moss. Remove this in late winter or early spring.

I've had the best success with daffodils for a couple of reasons: rodents don't like them and they can adapt to most soils. The only time I've had them not do well are when the soil was super dry AND next to tree roots. Otherwise they grow and multiply with ease.

We have tips on growing crocus, which is also an easy to grow bulb:
http://oldfashionedliving.com/crocus.html

~Brenda

Sunday, August 30, 2009

A Garden Hodge Podge

My idea of gardening is to discover something wild in my wood and weed around it with the utmost care until it has a chance to grow and spread. ~Margaret Bourke-White

I have a special garden themed post today with garden tips from Old Fashioned Living visitors. I love learning new things from our readers!

You can freeze your excess of tomatoes very simply by taking the core out of the ripe tomatoes, placing in freezer bags and putting them in the freezer. When you need them put into a sink full of very cold water, give them a few seconds and the skins will come right off. Place in a pot on the stove and let thaw on low heat and you are ready for whatever tomato dish you wish to make. I grow a lot of tomatoes so I can freeze them and they last through the winter. I have been doing this for years without a problem. Just don't forget to core them. ~Joyce

If your broccoli does bolt (goes to flower), you've still got a crop to harvest! The small bright-yellow flowers have a very mild broccoli flavor, and while you may balk at serving them as a crudités at your next party, they make a great TV time treat. Cut the flower clusters off the plant, leaving 2"-3" of the thin stem (you want them bite-sized, with a "handle"). Don't worry if some of the buds haven't opened; it's all good. From here, treat them as you would the raw green florets: give them a quick rinse and serve them with a side of salad dressing (I like ranch or bleu cheese) or chip dip thinned with a bit of milk (the flower clusters are too delicate for thick dips -- they come apart and you're left fishing little yellow flowers out of the onion dip). Couldn't be easier!

The cabbage moth larvae which are found on broccoli are also edible. My husband and I are interested in wild edibles and alternative food sources from cultures around the world, and during our last broccoli harvest, we came up with a handful of the tiny white segmented grubs. We fished them out of the blanching water and threw them in a skillet with a bit of olive oil and some Cajun seasoning. The flavor was quite good and the consistency was that of tiny little Cheetos. However, as open-minded as I am, I still couldn't get past the fact that I was eating bugs. It was fun to try...once. ~Susan (I might just take your word on it as far as the grubs are concerned! Brenda)

My mother always soaks her eggplant slices in buttermilk for about an hour before frying them. She says she soaks them to take out the bitter taste and it must work because they taste wonderful. She takes them straight out of the buttermilk and flours them using the buttermilk to make the flour stick. ~Laura

I grind my basil with half lemon juice and half olive oil to make my pesto. I add garlic and Parmesan, but no nuts at this time. Then I freeze it in ice cube trays. When it is frozen, I pop the cubes out and put them into a Ziploc bag. When I want pesto on veggies or pasta or bread, I take out a cube or two and thaw it. I have also put cubes in pasta sauce in place of dried basil. The lemon juice adds an extra kick in place of salt. ~Cheryl

On OFL we have tips bringing your plants indoors for the cold weather:
http://oldfashionedliving.com/plantcare.html

~Brenda

Thursday, August 27, 2009

Friday Recipes: Zucchini

It's that time of year again. Folks that grow zucchini sneak around the neighborhood quietly leaving zucchini on doorsteps of unsuspecting neighbors. What to do with all of that zucchini? Brenda says it quite well in one of her articles on Old Fashioned Living:

"Zucchini is one of the easiest vegetables to grow, and certainly provides one of the most abundant harvests. A single "giant" zucchini can provide enough grated squash to bake a dozen or more loaves of bread. A large zucchini works well for grating and the smaller tender zucchini are perfect for slicing.

Pick most zucchini at about 6 to 8 inches for the best taste, and save those "jumbo" squash that you miss for grating and using in baking. Squash blossoms will continue to set all the way up until fall IF you continue to pick the squash before it fully matures. If you miss even one, the entire plant will stop producing. This may be something you want to encourage if you over planted and are looking at a zucchini explosion, but if not, watch for those blossoms to drop off and harvest the squash!

Remember too, if you have an over abundance of any vegetable, contact your local churches, shelters or soup kitchens to see if they need fresh produce! You can share the harvest with those less fortunate.

To freeze zucchini simply grate, and place in resealable plastic freezer bags. For sliced zucchini choose the younger squash that is still tender skinned. Wash, and cut into 1/2 inch slices. Blanch in boiling water for 3 minutes; cool and drain. Package in containers and freeze. The zucchini bread and cake also freeze well. Cool after baking and double wrap with foil.

Shredded zucchini is a versatile ingredient. Mix 1 cup into into your favorite brownie dough, meatloaf or meatball recipes. Whenever you need extra moisture try experimenting with a cup of shredded zucchini."

Below are several recipes found on Old Fashioned Living, then below that you will find quite a few from the blogging world as well. Enjoy!


Spicy Zucchini Bread

2 eggs, beaten
1 1/3 cup sugar
1/3 cup vegetable oil
2 cups flour
1 tsp. baking soda
1/2 tsp. baking powder
Dash salt
1/2 tsp. cinnamon
1/2 tsp. ginger
1/2 tsp. ground cloves
1 cup grated zucchini
1/2 cup crushed walnuts

Beat sugar into eggs, add oil and mix well. Sift together dry ingredients, add beaten egg. Stir in zucchini. Beat until batter in very smooth. Add nuts. Pour into greased, floured 9x5 loaf pan. Bake at 350 degrees for 60 minutes. Turn out onto wire rack to cool.


Zucchini Chocolate Chip Cake

1 cup packed brown sugar
1/2 cup granulated sugar
1/2 cup butter or margarine
1/2 cup vegetable oil
3 eggs
1 tsp. vanilla
1/2 cup buttermilk
2 1/2 cups all purpose flour
3/4 tsp. allspice
3/4 tsp. cinnamon
3/4 tsp. salt
2 tsp. baking soda
4 Tbsp. cocoa
2 1/2 cups grated/shredded zucchini
1 cup mini chocolate chips

Preheat oven to 325 degrees. Grease and flour a 9x13 pan. Cream sugars, butter, and oil. Add eggs, buttermilk and vanilla. Stir to mix. Sift together dry ingredients. Mix all together except chocolate chips. After mixing well, gently fold in chips. Pour into pan. Bake for 45 minutes until toothpick comes out clean when inserted in center. Dust with powdered sugar or a fluffy light frosting.


Honey Spice Cake

1 cup shortening
2 cups honey
3 eggs, beaten
1 cup sour milk
3 1/2 cups flour
2 tsp. baking soda
3/4 tsp. baking powder
1/2 tsp. salt
2 tsp. cinnamon
1 tsp. nutmeg
1 tsp. allspice
1 1/2 cups grated zucchini

Cream shortening and honey. Add in eggs. In another bowl sift flour, soda, powder,salt and spices. Gradually add milk and flour mixture, taking turns, to egg mixture. Fold in zucchini. Pour into loaf pan and bake at 350 degrees for 45-50 minutes.


Zucchini Casserole

3-4 medium zucchini, unpeeled
2 tablespoons butter
2 tsp. parsley, chopped
2 tablespoons chopped onion
1/2 pound fresh mushrooms, sliced
1 tsp. salt
1 garlic clove, minced fine
1 tsp. fresh oregano or 1/2 tsp. dried
1/2 cup cheddar cheese, grated
1/2 cup buttered, seasoned bread crumbs

Wash and slice zucchini in thin rings. In a large skillet sauté parsley and onion in the butter until soft, add mushrooms, then garlic (the last minute). Stir in remaining ingredients, except bread crumbs. Pour into buttered casserole dish. Sprinkle bread crumbs over top, and Parmesan cheese if desired. Cover with foil and bake at 275 degrees for 30 minutes. Remove foil and bake about 15 minutes longer or until browned.


Zucchini Italian

1 tablespoon olive oil
1 small onion, sliced into very thin rings
1 medium zucchini, cubed
1 pound green beans, sliced into one inch pieces
1 can tomato sauce
1 clove garlic, minced
pepper and salt to taste
Dash of dried tarragon
1 tablespoon fresh basil or oregano, or 1 tsp. dried

Brown onion, add other ingredients in order and simmer until tender.


Zucchini Cheese Soup

2 cups cubed zucchini
3 tablespoons minced onion
1/4 cup butter
3 tablespoons flour
3 1/2 cups evaporated milk
4 cups skim, 1/2 or 2% milk
3 cups grated colby-jack cheese
salt and pepper to taste
Fresh chives or green onion for garnish

Saute zucchini and onion in the butter. Blend in flour. Add milk gradually and heat, stirring constantly, until cheese is melted and soup is smooth and thickened. Season with salt and pepper. Garnish with green onion or chives on top of soup.


Zucchini Salad

2 medium zucchini, sliced thin
2 medium tomatoes, sliced thin
1 cup red onion, sliced thin in rings

Dressing:
1/2 cup olive oil
2 tablespoons wine or herb vinegar
2 tsp. fresh chopped basil leaves
1 tablespoon chopped parsley

Pour dressing over zucchini, tomatoes and onion rings. Allow to marinate for several hours.


Morning Glory Zucchini Bread

2 to 2 1/2 cups shredded zucchini
1 cup vegetable oil
3 eggs
1 tsp vanilla
2 cups sugar
3 cups all purpose flour
1 tsp baking soda
1/4 tsp baking powder
1 tsp salt
1 tsp cinnamon

Click here to get the instructions


Zucchini and Summer Squash Pickles

1 pound zucchini and/or summer squash
1 small yellow onion
2 tablespoons kosher salt
2 cups cider vinegar
1 cup sugar
1 1/2 teaspoons dry mustard
1 1/2 teaspoons crushed mustard seeds
Scant 1 teaspoon ground turmeric

Click here to get the instructions


Chocolate Zucchini Bread

2 C flour
2 t cinnamon
1/2 t salt
1 1/2 t baking soda
6 T unsweetened cocoa powder
1/2 C canola oil
1 C sugar
1/4 C brown sugar
3 eggs
2 t vanilla
1/2 C sour cream
3 C grated zucchini
3/4 C mini chocolate chips

Topping:
2 T brown sugar
2 T white sugar
1/2 t cinnamon

Click here to get the instructions


Stuffed Zucchini

2 medium zucchini
1 tblsp butter
1 tblsp olive oil, plus more for drizzling
2-3 green onions, chopped
2 roma tomatoes
salt and pepper
½ cup bread crumbs
½ cup Parmesan, plus more for topping

Click here to get the instructions


Zucchini and Tomato Casserole
(THIS is fabulous! I had it for lunch today ~Amanda)

2 large tomatoes sliced in half inch rings
2-3 small zucchini sliced lengthwise in quarter inch strips
3 large garlic cloves sliced thinly
10 sprigs of thyme
Salt and pepper
1 c. market cheese like Gouda or Gruyere grated on the large side of your box grater
1/3 c. whole wheat bread crumbs

Click here to get the instructions


Chocolate Zucchini Cake

1/4 cup unsalted butter, softened
1/4 cup canola oil
6 1/8 ounces granulated sugar (1/2 cup plus 6 tablespoons)
1/2 teaspoon vanilla extract
1/2 teaspoon baking soda
1/4 teaspoon baking powder
1/4 teaspoon salt
1 large egg
1/4 cup buttermilk
1 1/4 cup unbleached all purpose flour
1 1/8 ounces Dutch-process cocoa
(optional 1 teaspoon espresso powder)
1 cup zucchini, finely grated (middle/seeds removed)
1/2 cup (3 ounces) chocolate chips

Ganache Icing:
3 ounces heavy cream
4 1/2 ounces dark chocolate

Click here to get the instructions


Double Chocolate Zucchini Cake

2 cups all-purpose flour
1/2 cup whole wheat flour
1/2 cup unsweetened cocoa (NOT dutch process)
1 tsp baking soda
1 cup butter, softened
1 1/2 cups sugar
1/4 cup oil
2 large eggs
1/2 cup buttermilk
1 tsp vanilla extract
2 cups zucchini, unpeeled and shredded
1 cup dark chocolate chips

Click here to get the instructions


Zucchini with Parmesan

2-3 zucchini, washed and sliced on the diagonal into ½ inch thick slices
2-3 T olive oil
2 cloves garlic, minced
1 T chopped fresh basil
Salt and pepper
A pinch of dried red chile flakes
2-3 T grated parmesan

Click here to get the instructions


Squash Stuffed with Corn, Tomatoes, Green Chiles

3 medium zucchini squash
2 thin corn tortillas
2 tsp. ancho chile powder
3 oz. manchego cheese, cubed plus 1 oz. shredded manchego cheese
1 Tbsp. extra virgin olive oil
1 medium shallot, diced
1 small red onion, diced
1 c. fresh corn kernels
2 roma tomatoes, seeded and chopped
4 oz. chopped green chiles
Salt and pepper

Click here to get the instructions


Lemon-Zucchini Cornmeal Cookies

1/2 cup (1 stick) unsalted butter, at room temperature
1 cup confectioners' sugar
1/2 teaspoon vanilla extract
1 teaspoon finely grated lemon zest
1 teaspoon coarse salt
1 cup all-purpose flour
1/2 cup fine cornmeal
1 medium zucchini, grated on small holes of a box grater (about 1 cup)

Click here to get the instructions
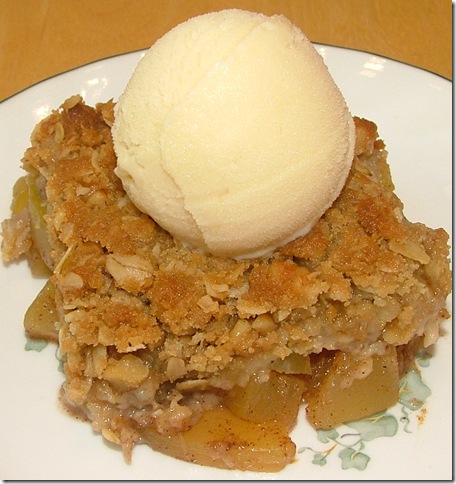


Katrina's Zucchini Crisp

1 large zucchini (about 1 1/2-2 lbs.), peeled, seeded and sliced
6 tablespoons fresh lemon juice
3/4 cup granulated sugar
1 1/2 teaspoons ground cinnamon
1/8 teaspoon nutmeg
1 teaspoon lemon zest

Crumb topping:
3/4 cup light golden brown sugar, packed
3/4 cup all purpose flour
3/4 cup old fashioned oats
1/8 teaspoon salt
6 tablespoons unsalted butter, (can be pretty cold from the fridge), cubed
1/3 cup walnuts, chopped

Click here to get the instructions


Soba Noodles with Edamame, Zucchini, and Spinach

Sauce:
Low sodium soy sauce
Water
Rice wine vinegar
Honey
Garlic Chile Paste

Soba noodles
1 T Sesame oil
2 cloves garlic, minced
2 zucchini, chopped
1/2 cup shelled edamame
1 cup fresh spinach leaves
3 green onions, chopped
Black pepper, to taste
Sesame seeds
Extra green onions for garnish

Click here to get the instructions


Zucchini Bread with Dried Cranberries

Nonstick cooking spray
1 3/4 cups shredded zucchini
3/4 cup packed light-brown sugar
2 tablespoons granulated sugar
1/3 cup canola oil
1/3 cup applesauce
2 teaspoons vanilla extract
2 large eggs
3/4 cup all-purpose flour
3/4 cup whole wheat flour
1/2 teaspoon baking powder
1/2 teaspoon baking soda
1 1/2 teaspoons ground cinnamon
Fresh ground nutmeg-I didn’t measure, just a bit
1/8 teaspoon ground cloves
3/4 teaspoon salt
1/2-3/4 cup dried cranberries
Cinnamon/Sugar to sprinkle on top

Click here to get the instructions


Zucchini Spice Cake

2 cups all purpose flour (or gluten free blend, Bob's Red Mill)
1 teaspoon baking powder
1 tsp baking soda
1/8 teaspoon sea salt
1/2 tsp ground black pepper
1 teaspoon ground nutmeg
1 teaspoon ground cinnamon
1/4 teaspoon ground allspice
3/4 cup organic brown sugar
3/4 cup turbinado sugar or granulate white
1 cup unsalted butter, room temp
3 large eggs
1/2 cup buttermilk
1 tsp vanilla extract
1 1/2 cups shredded zucchini

Click here to get the instructions


Tuesday, August 25, 2009

A Kid's Chalk Board Table

A Kid's Chalk Board Table
by Brenda Hyde

Trash to treasure projects are rewarding, especially when the piece of furniture you are working on would have actually been thrown out! Our latest project was my husband's creative idea and it turned out great. He found an old coffee table in his dad's shed and had the idea to make a chalk board table for our kids.

The materials we used:

coffee table
wood putty
4 pastel acrylic paints-yellow, pink, blue and yellow
one can blackboard spray paint
Kilz acrylic primer
paint brushes
sandpaper or sander
regular black spray paint

Wash your table if it's dirty or dusty and allow it to dry. Take off the legs if they are removable. Use the wood putty to fill in any gouges or deep scratches. Allow to dry and sand. Wipe the table with a clean cloth to remove dust. Prime the entire table and the legs. After the primer dries, paint each leg a different pastel color. They will need two coats each. Allow them to dry between coats. (See tips below)


Turn the table top over so the bottom is up. Using the REGULAR black spray paint cover the bottom. Allow to dry and give it a second coat. Make sure it's completely dry. Place an old towel on your work surface and turn the table over so the top is face up. There are several brands of blackboard paint. Follow the directions and paint the top only of the table. They go on just like spray paint and our fairly easy to use. Spray evenly and make sure no one touches it until it's COMPLETELY dry. It takes longer than paint.

When the legs and table are completely dry, attach the legs back to the table. Most of the blackboard paints instruct a certain drying period of 1 or 2 days before using.

This such an easy and fun project. Our kids loved the table! If your kids are older they can even help with the project.

Working Tips

Sandpaper: A 4x6 inch piece of 2x4 wood works well for wrapping the sandpaper around the block and using this to sand rather than just the sandpaper itself. It will make it easier to sand evenly.

Painting: Take a scrap piece of wood (we used a piece of 4x4) and drill 4 holes in the wood spaced several inches apart. Screw in the 4 tables legs just enough for them to stand up. This worked great for painting the legs and allowing them to dry.